Open the cabinet under almost any sink and you will see the same scene: pipes down the middle, bottles that drifted to the back, and a floor nobody has looked at in months. The fix is not another set of bins. It is a layout drawn around your actual plumbing, plus a simple way to catch a leak early.
This guide gives you a six-point measuring method, a zone layout that works around a central drain, a short safety section for household chemicals, and a printable measure-and-layout sheet to take to the cabinet.
Start With the Cabinet You Have
Room size matters less than what is already inside the cabinet. Find your case first:
| Your cabinet | What it changes | Best first move |
|---|---|---|
| Single bowl, center drain | The pipe splits the space into a left and a right pocket | Two narrow bins, one per side; keep the center open |
| Double bowl, offset trap | The drain runs sideways and leaves one wide pocket | Put daily bins in the wide pocket; keep the plumbing side clear |
| Garbage disposal | The disposal and dishwasher hose take the center and back | Low bins on either side; avoid pull-out trays |
| Water filter or reverse-osmosis system | Filter housings and a tank need service access | Treat that area as off-limits and store around it |
| Bathroom vanity | Shallow, with the drain near the back, sometimes a cutout drawer | Short bins for small daily items only |
Measure Once, Then Draw It
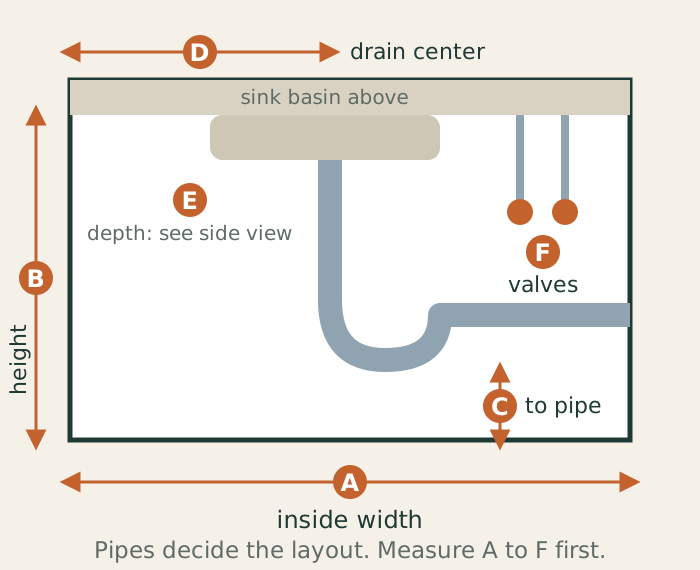
Measuring around the plumbing prevents most under-sink mistakes. Take these six measurements and write them down.
| Measure | Why it matters | |
|---|---|---|
| A | Inside width, side wall to side wall | Sets the widest bin you can use |
| B | Height at the front, floor to the underside of the basin | The basin cuts into the front, so the back is usually taller |
| C | Floor to the lowest pipe, usually the trap | Anything stored under the trap must fit beneath it |
| D | Drain center, measured from the left wall | Decides the size of the left and right pockets |
| E | Depth, front frame to back wall | The longest bin that still lets the door close |
| F | Position and height of the shut-off valves | They must stay reachable at all times |
Subtract about half an inch from every pocket width. That small gap lets you slide a bin out with one hand and keeps the cabinet walls from scuffing. Here is the math with example numbers; yours will differ:
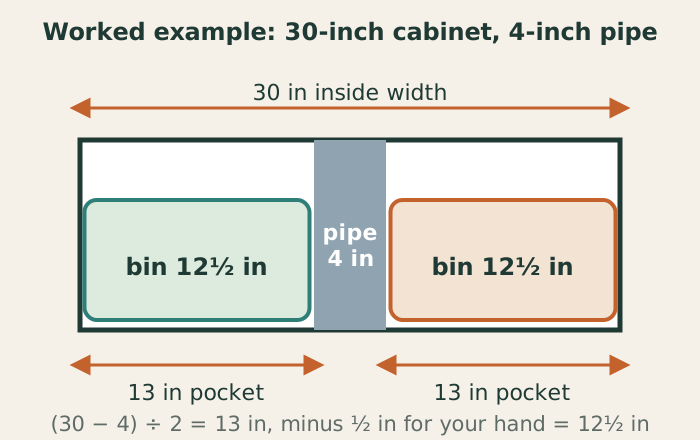
Before you buy anything, cut cardboard to the planned bin sizes and test the layout. It costs nothing and catches most sizing errors.
Empty, Sort, and Fix What You Find
Take everything out and sort it into three piles: use weekly, backup, and remove. Remove duplicates, expired products, and half-empty bottles you never touch. Then wipe the floor and walls and let them dry.
Look closely before you rebuild. A swollen or stained cabinet floor, white or green crust on a pipe connection, or a musty smell can mean a slow leak. Fix the source first, because storage placed over a leak only hides it.
Do not pour unwanted chemicals down the drain or throw them in the trash. Many areas run household hazardous waste collection; see the EPA guidance on household hazardous waste .
Build Three Zones Around the Pipes
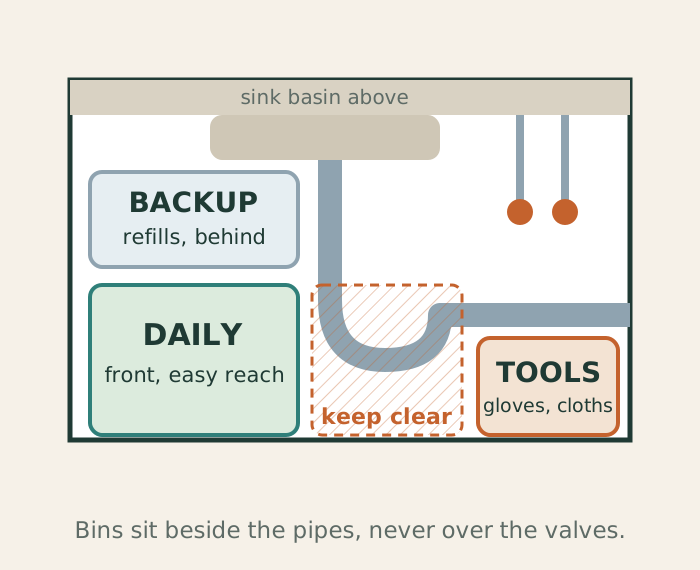
- Daily zone: front and easiest to reach. Dish soap, sponges, dishwasher tablets, and the one all-purpose cleaner you really use.
- Tools zone: gloves, brushes, and spare cloths. A ventilated basket lets damp cloths dry.
- Backup zone: unopened refills, placed behind or above the daily bins.
- Keep-clear zone: the trap, shut-off valves, disposal, and filter. If a plumber needs access, you should be able to clear this area in under a minute.
The rule is simple: the more often you use something, the closer to the front it lives. The pipes decide the layout, not the other way around.
Choose Containers After You Measure
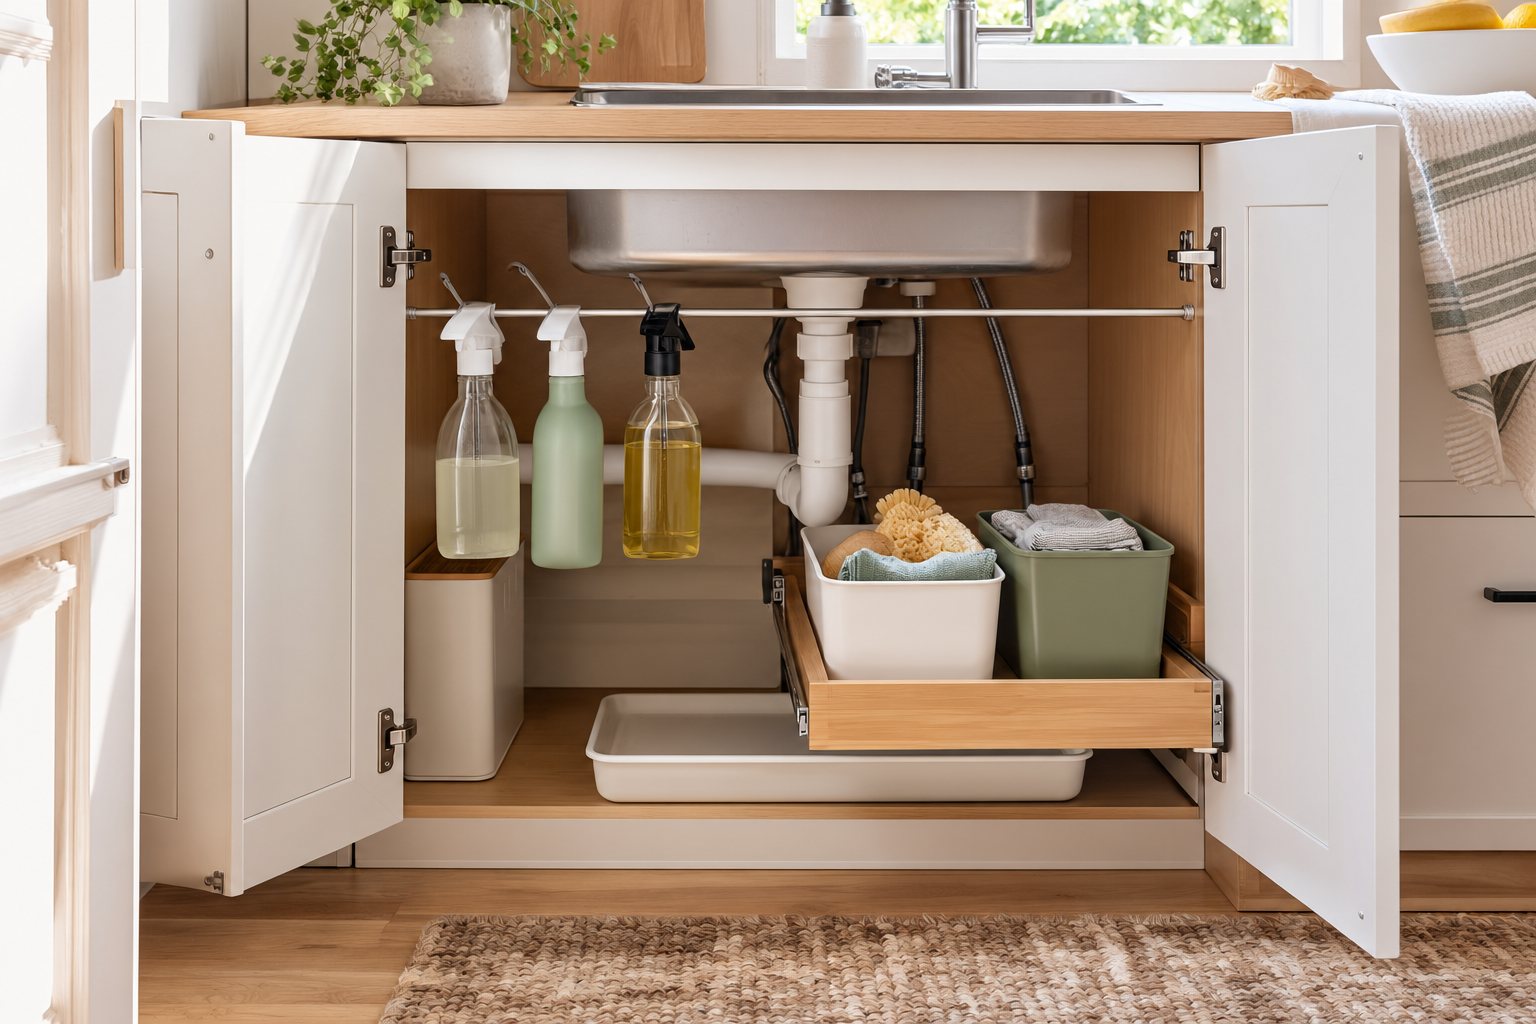
- Open bins with handles beat lidded boxes, because you reach in often. Washable plastic or metal also copes with drips; avoid cardboard and untreated wood.
- Narrow pairs around a pipe use space that one wide container cannot.
- Pull-out trays only work when nothing sits in front of the track. If the trap, a hose, or the disposal blocks the path, use a handled bin instead.
- Spray bottles can hang by their triggers from a tension rod, but only where the rod sits between two walls and clear of the pipes, and only within its weight rating.
- Door organizers are for light items such as gloves and cloths. Close the door several times to confirm it does not hit the plumbing or the basin.
- Heavy items stay low. A gallon of liquid weighs roughly 8 pounds, so keep it on the cabinet floor and follow the load rating of any insert you add.
Keep Chemicals Secure and Separate
- Keep products in their original, labeled containers.
- Add a child-safety latch if children or pets can reach the cabinet.
- Never store bleach next to ammonia-based or acidic cleaners. Mixed, they can release toxic gas, so give them separate bins.
- Medicines, food, and documents do not belong here. Damp air and leaks damage them, and they should not be in a kitchen cleaning cabinet.
- If someone swallows a product, call Poison Help in the US at 1-800-222-1222 (HRSA Poison Help, archived page ). In the UK, call NHS 111, or 999 in an emergency.
To compare cleaners by ingredients, the EPA Safer Choice program lists products that meet its safer-ingredient criteria.
Make Leaks Easy to See
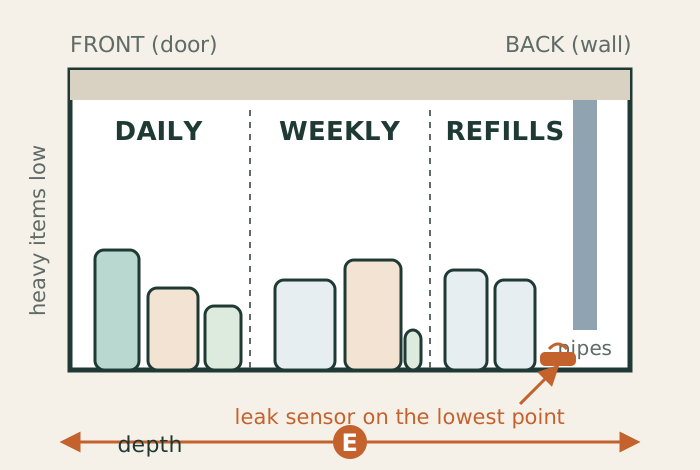
A leak under a sink is common, slow, and quiet. Three habits catch it early:
- Leave the floor visible. Do not pack bins tight against the plumbing.
- Add a leak alarm. A small battery-powered water sensor on the cabinet floor, at the lowest point, is an inexpensive early warning.
- Run a monthly five-minute check. Pull the front bins out and look at four spots:
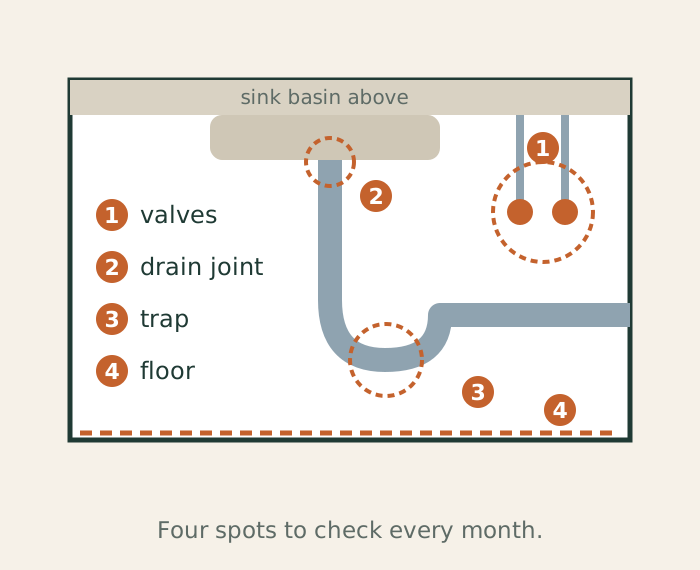
- Valves and supply lines: look for drips, crust, or stains.
- Drain joint under the basin: run a little water and watch for seepage.
- The trap: check the joints and the bottom of the bend for moisture.
- The cabinet floor: feel for dampness or swelling, and check bottles for cracks or residue.
Return everything only when the area is dry.
If you find water, close both shut-off valves (clockwise) and call a plumber. Do not force a stuck valve, and do not cover an active leak with a liner or tray.
The Weekly Reset and the Enough-Storage Test
Once a week, spend two minutes pulling the front bins forward, returning stray products, throwing out empties, wiping drips, and glancing at the floor.
You have enough storage when:
- every daily product has an obvious home;
- you can reach any backup without moving more than one bin;
- the trap and valves are visible;
- the door closes freely;
- you can see the cabinet floor.
If you keep wanting another organizer, you probably have too many products. Edit the pile before you add storage.
Frequently Asked Questions
What should go under a kitchen sink?
Dish soap, sponges, dishwasher tablets, cleaning cloths, and the cleaning products you actually use. Keep food, medicines, and important papers elsewhere, because a slow leak or damp air can ruin them.
How do I organize a cabinet with plumbing?
Measure the width, the front height, the distance from the floor to the lowest pipe, and the drain position. Then use narrow bins on each side of the pipe and keep the trap and shut-off valves clear.
How do I organize under a sink with a garbage disposal?
Treat the disposal and dishwasher hose area as off-limits and use low, handled bins on either side. Skip pull-out trays that need a clear path to slide.
How can I tell if my under-sink cabinet is leaking?
Look for a swollen or stained cabinet floor, white or green crust on pipe connections, drips, or a musty smell. A battery-powered leak alarm on the cabinet floor gives an early warning.
What should I not store under a sink?
Food, medicines, electronics, and documents. Also keep bleach apart from ammonia-based and acidic cleaners, and keep all products out of children’s reach.
Are pull-out drawers worth it under a sink?
They help when the cabinet is deep and nothing sits in front of the track. If a pipe, trap, or hose blocks the path, a bin with a handle works better.
Sources
- U.S. EPA, Household Hazardous Waste
- U.S. EPA, Safer Choice
- U.S. Health Resources and Services Administration (HRSA), Poison Help: About Us, archived snapshot of poisonhelp.hrsa.gov, December 16, 2024 (page date not shown): the toll-free Poison Help line, 1-800-222-1222, connects you to your local poison center
Related Guides
- Small Bathroom Organization Ideas for Practical Space
- Small Kitchen Organization: 5-Foot Galley Ideas
- Small Apartment Organization: Maximizing Storage in 350 Sq Ft
- Renter-Friendly Storage Ideas for a Small Kitchen
Image Credits
The five diagrams and the cover illustration in this guide were created for this site. The guide uses no third-party photographs or artwork.